GAME GUIDE
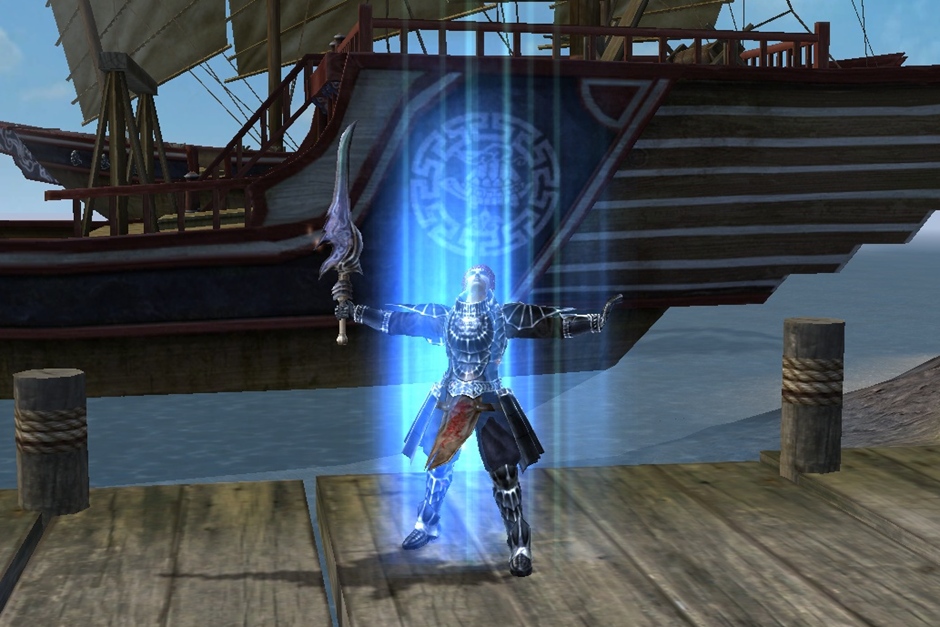
Characters
In WoM2 you can choose any of 4 character classes: Assassin, Mage, Sura or Warrior. Once you reach level 5, you must choose one of two different skill trees available for your class:
Blade Assassin
With his blazing fast dagger attack, he is able to combat enemies from close range and poison them from afar, thereafter hiding back in the shadow thanks to his Stealth ability.
Archer Assassin
Armed with his fearsome bow, the Archer is able to inflict massive damage to his enemies before they can even approach him, making him one of the most fearsome opponents in duel.
Light Mage
There's no better companion in battle than the Light Mage, for he is able to cure your wounds with his spells and make you swift. He is also able to attack on his own, and his buff magic works best on himself.
Dragon Mage
The magic of the Dragon turns his own attacks and those of his fellow adventurers precise and deadly. The Dragon Mage can also stand for himself in battle and, like the LIght Mage, yields higher benefit from his magic than others do.
Weapon Sura
The Sura is a fighter who has made an alliance with the darkness, as his evil hand attests. The weapon sura is able to fight like a warrior while dissolving the magic of his opponents into the void.
Black Magic Sura
Purely a magic character, the Black Magic sura unleashes deadly dark magic onto his enemies while protecting himself from their attacks. This makes him the most deadly duelist along with the Archer Assassin.
Body Warrior
The Arahan is able to inflict massive physical damage with his weapon thanks to the Aura of Sword, but he is vulnerable to attacks, particularly the magical ones.
Mental Warrior
The power of Chi gives the Mental Warrior a physical endurance superior to any other class. The tradeoff is his speed.
Common skills
Awareness
Determines your capacity in measuring the dangerousness of the creatures that populate the world and whether it pays off to hunt them down. Awareness can be upgraded through completing hunting quests.
Language skills
Determine your ability to communicate with players from other kingdoms. It is also possible to gain temporary understanding of foreign language by using a Language Ring.
Fishing
Fishing is available from level 30 and requires a fishing rod which can itself be upgraded. There are many types of fish to be found plus other items. Fish can be grilled to obtain certain temporary advantages.
Combo
Combo skill allows extending your attack movement by two further moves.
Mining
Mining improves your ability to extract ores from the various veins scattered around the map. Ores can be used to power up your accesories.
Horse Riding
Horse Riding determines your ability to ride and attack from a horse.
Horse Taming
Horse Taming improves your chances to call up your horse.
Gear
In WoM2, upgrading your gear is crucial for advancing in the game. As you progress, you'll need to upgrade your weapons and armour to keep up with the increasing difficulty of enemies. You wouldn’t like to wear your lv 1 armour to flex anyway!
Throughout the game, you will find better and better gear; just as weapons, armours and accessories. Weapons include swords, bows, daggers, bells, and other melee or ranged weapons; armour further includes helmets, shields and boots; accessories include earrings, necklaces, bracelets and belts. However, you can only drop the pieces of belts from different dungeons. You need the craftsmanship of Aranyo and Yu-Hwan for a quality belt!
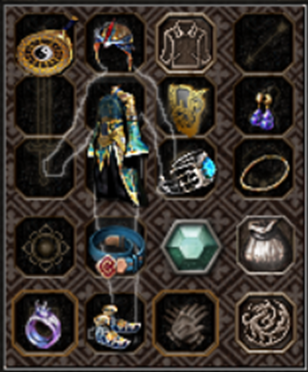
Speaking of equipables, you can also wear 2 time-limited items at once for extra bonuses such as increased drop chance, increased experience, increased attack damage and defence, and so on. It is also possible to increase your stats such as STR and INT with them.
There are also some ways to improve your existing gear and get better without having to drop or purchase something new:
Upgrading: You are allowed to upgrade the level or the quality of your items by investing resources like Yang and upgrade materials, you can even evolve them into a better item.
At the early stages of the game, you may want to upgrade your equipment at the town blacksmith as it is the cheapest way to upgrade your basics. You can also use the guild blacksmiths who are slightly better at their job, but they may charge you more
Later on, you may want to use the special scrolls that will allow you to keep your item even if it fails while upgrading (such as Blessing Scroll) or the scrolls that will increase the success chance of the upgrade (such as War God Blessing Scroll and Master Compass).


As an extra, if you are interested in Demon Tower, there is a generous blacksmith in the middle of the tower who can upgrade your equipment without any upgrade material.
Socketing Gems or Spirit Stones: You can socket or embed gems or spirit stones into your gear to improve its stats.
Gems, craftable through the Alchemist, are known to increase the already existing bonus on your accessories. Meanwhile Spirit Stones, looted from Metin stones and upgraded by Seon-Pyeoung, may provide different bonuses to your weapons or armours; such as increased critical hit chance, additional damage or bonus resistance to certain types of damage.
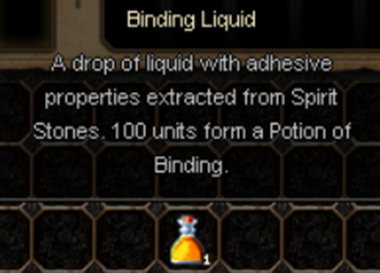
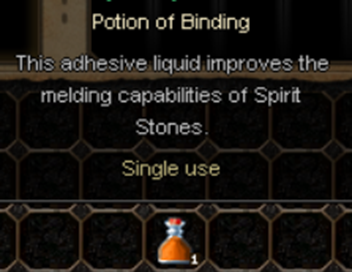
Additionally, instead of dropping your spirit stones up to +3, you can convert them into Binding Liquid. When you have 100 units of Binding Liquid, you can merge them into Potion of Binding, which will increase your chance to attach a Spirit Stone to your weapon/armour successfully.
Dragon Soul Alchemy: It is a craftable and upgradable component that temporarily boosts your character with a mix of defensive, offensive and practical bonuses. You might want to activate your alchemy set only during a particularly challenging boss fight, or a guild war as the Dragon Soul Stones are time-limited.
These bonuses depend on the type of alchemy gemstone you decide to socket into your character’s own Dragon Soul Alchemy, and there are six types in total; Onyx, Diamond, Ruby, Jade, Sapphire and Garnet.
The time for your precious Alchemy Stones can be renewed with time elixirs that come in different sizes.


Enchanting: Another way to improve your gear is adding bonuses and rolling them into the best/the most suitable ones for you.
First items that will help you improve your gear (up to level 40) will be the Green Bonus Adder and Green Bonus Changer. However, you should also note down that Green Bonus Changer is slightly worse than the normal Bonus Changer in regard to providing you with the maximum bonus value.
You can use special enchanting goodies for higher level items, such as the Bonus Adder or Bonus Changer.
Additionally, Blessing Marble can bring the fifth bonus to the table.
Maps
- Kingdoms
-
Joan, Pyungmoo, Yongan:Your journey starts right here! You battle animals on this map, such as tigers, bears, wolves.
-
Bokjung, Bakra, Yayang:The second town, here you meet human-like monsters on this map, including the Savage General, Savage Minion, and Bestial Captain.
-
Waryong, Imha, Jungrang:These are the guild zones, usually known as map 3 or the guild map. Only cursed animals which instantly attack you can be found on this map.
- Neutral maps
-
Valley of Seungryong:After map 1 and 2, the third map, The Valley of Seungryong, is frequently where players level up. On some islands, farming is also frequently practiced by beginners.
-
Yongbi Desert:Not for the faint of heart, the desert of Yongbi is home to many spiders, scorpions, and snakes. However, you can find two monkey dungeons that are useful for farming horse medals.
-
Hwang Temple:The 11 floors of the Hwang Temple, sometimes known as the Dark Temple, contain arcane monsters and a huge plain filled with frogs.
-
Mount Sohan:A lot of undead and ice monsters inhabit the icy landscapes of Mount Sohan.
-
Fireland:Although Fireland is a hot place, these monsters have adapted to it.
-
Snakefield:Snakefield doesn't appear to be particularly deadly at first glance. Monsters that also emerge in the Desert are present at first. However, you come across really powerful monsters as you venture deeper.
-
Land of Giants:The map Land of Giants, features formidable foes. The majority of them are also hostile.
-
Ghost Forest:This map is where your high level adventure begins. You will encounter diffrent type of monsters such as Haunted Willows and Dryads, but be careful they will steal your SP.
-
Red Forest:This is one of the most common map where you can farm, at high level, in the game. Gear up! Enemies here are far more dangerous.
- Dungeon maps
- Sujin Dungeon: The first ape dungeon, known as Sujin Dungeon or Easy Ape Dungeon, may be found in every kingdom's second town.
- Honobo Dungeon: Honobo Dungeon, also known as Normal Ape Dungeon, is a challenging map that contains numerous mazes.
- Jokor Dungeon: The strongest of them is Jokor Dungeon, also known as Expert/Hard Ape Dungeon.
- Spider Dungeon 1: A well-liked location for leveling is Spider Dungeon 1, or SD1.
- Spider Dungeon 2: In order to access this map, Spider Dungeon 2 also known as SD2, you must give Chuk-Sal in SD1 a Passage Ticket. Despite looking familiar, the monsters on this map are significantly more powerful.
- Spider Dungeon 3: The final spider cave is known as Spider Dungeon 3 (SD3). Players love to level up and farm during events in this area.
- Devil's Catacomb 3: The first big challenge. Gather your team and prepare for the powerful Azrael "the angel of death". It will be a difficult journey but upon deafting Azrael your reward will be worth it.
- Heaven Lair 1: A frozen realm of untold treasures and ancient secrets. Lurking within this icy domain is the legendary Ice Witch, a fearsome world boss that even the bravest warriors will find challenging to conquer.
- Heaven Lair 2: To access it, you must first walk through Heaven Lair 1. Monsters here often drop high level gear but are far more challenging. When you walk to the upper left corner, you will find the Aqua's Drake nest guarded by the Heaven's General that holds the key to the dungeon.
Travel
With the help of this NPC you can travel in any desired neutral map, or in the maps of your kingdom, of course for a small fee.
To be able to travel you have to gain experience before, maps are accessible from different levels.
- Map1 < level 15
- Map2 – level 15
- Guild maps – level 15
- Seungryong Valley – level 25
- Hwang Temple – level 30
- Yongbi Desert – level 30
- Sohan Mount – level 40
- Fireland – level 50
- Ghost Forest – level 60
- Red Wood Forest – level 65

Horse
- Pony: Your first horse, with this you can only travel, you cannot attack while riding
- To get a pony you have to reach level 15 and then go find and talk to the Stable Boy, he will guide you in order to get it.
- Armed Horse: A more advanced horse with which you can attack while riding
- To get an armed horse you have to reach level 35 and your horse needs to advance 10 levels.
- Military Horse: Besides the fact that you can travel and fight while riding, having a military horse gives you the chance to learn a series of skills that will help you in your adventure.
- To get a military horse you have to reach level 50 and your horse needs to advance another 10 levels (armed horse level needs to be 20).
Mount
When you reach level 40 you will be able to adopt a pet from Jong-Chug
If you take care of him, raise him and feed him with special potions called Cheheom, you will be able to evolve him into a mount.
After you evolve him (he needs to be at least level 50) you will be able to travel at a higher speed than with the horse, you will be able to attack while riding and he will grant you some bonuses (this depends on what liquids you will feed your pet with)
I you feed him well he can increase your attack, your awareness or your defence.
Marriage
After the wedding at the Old Lady's, our adventure in marriage begins. Your Couple's Ring turns into a Wedding Ring which allows us to teleport to our spouse. However, your spouse must be on the same channel.
- The minimum level of getting married - 25lvl
- The maximum difference between characters for marriage - 30lvl
- You can marry any character, regardless of gender

Couple's Ring - To get it, you need to complete the mission from the Old Lady, which consists in killing several Jin Hee.

Marriage Ring - you receive it after the wedding ceremony.

Love Points - they increase when the couple is close to each other. You can find your Love Points status in the upper left corner of the screen.
Unique marriage items
The effect of the item depends on the percentage of Love Points. For example, if a couple has 50% Love Points, the maximum effect is halved.

Harmony Necklace - Increases couple's defense on both spouses by a maximum of 30 if worn by one of them.

Love Necklace - Increases couple's attack power on both spouses by a maximum of 40 if worn by one of them.

Harmony Bracelet - Reduce the attack power of enemy monsters on both spouses by a maximum of 15 if worn by one of them.

Love Earrings - Increases couple's chance of critical attack on both spouses by a maximum of 8% if worn by one of them.

Love Bracelet - Increases couple's experience gain by a maximum of 20% if worn by one of them.

Harmony Earring - Increases couple's chance of pierce attack on both spouses by a maximum of 8% if worn by one of them.
Battle
Life is not always sunshine and butterflies, sometimes you may need to team up and fight them when you see a deadly enemy. Let’s take a look at the battle strategies:
Party
Being in a party with your mates can bring advantages in both PvM and PvP.
- Leadership: When the leader of the party has a developed leadership skill, they can provide the other party members with some attributes like extra HP, shorter cooldown duration, attack damage and so on. Leadership skill can be improved by reading Sun-Zi (till M1), Wu-Zi (till G1) and Gui-Gu (till P) books. The first bonus can be activated when the skill reaches 10 points. When it reaches P, the group leader will be able to provide all members in the group (except the leader) with leadership attributes.
- Buffs: Good news for our hard-working mages! A mage can buff everyone in the party at once.
Guild
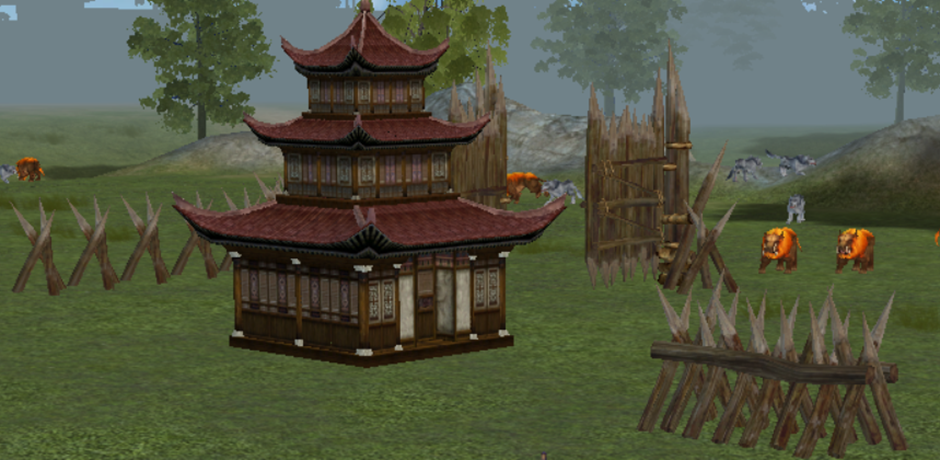
A guild is ideal for a bigger group of players who have similar intentions and interests in the gameplay. The maximum level for a guild is level 20, yet you can create a guild logo when it is level 3.
The guild leader can purchase land for the guild’s name and build some buildings on the land to personalise the area. Some NPCs (such as blacksmiths and alchemists) can be placed in the land and they can serve to all players in exchange for some Yang. 10% of the blacksmith income will be transferred into the guild funds. Guild funds are required for the monthly rent of the guild land and guild members are also able to donate the guild. The members of the respective guild will have some benefits by using their NPCs.
Guild Wars
This right allows members to choose combatant members and cause guild wars. As a result it should only be given to those members who are known to the leader.
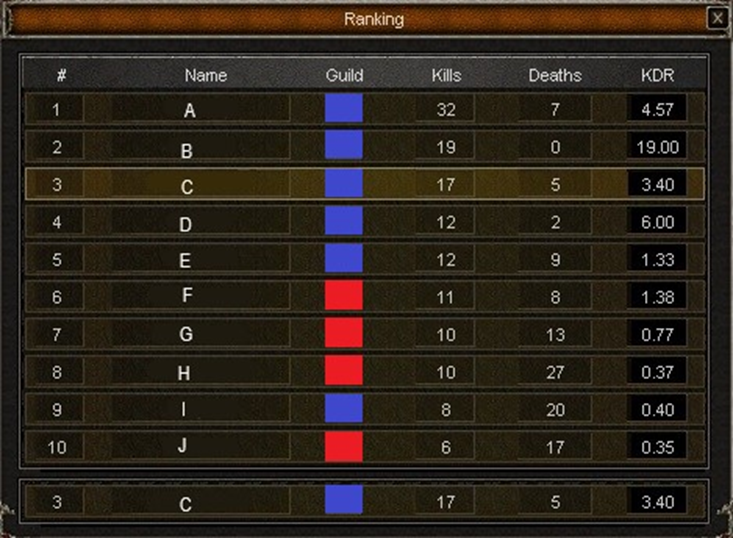
The guild leader or a member with the "War" rank can declare war on other guilds or accept the challenge to battle initiated by the leader of another guild. Both guilds require at least 8 members with the combatant option checked to engage in combat. Guild Wars are usually fought to measure the strength of one guild against another. The winning guild will be rewarded with rank points. The guild war can therefore also be used to increase the level of the guild.
Guild Skills
This right allows members to use guild powers (such as increased HP/SP, defence, critical hit chance, attack/moving speed and decreased cooldown durations) during a guild war. Each member who needs to benefit from skills during the guild war must be given this right because they are activated by each player individually.

Hunting
In WoM2, farming is a really important activity that allow players to gain experience points, acquire items and resources. The game features a large variety of monsters that players can fight, ranging from low-level monster to powerful bosses. Each monster has its own unique stats and abilities, and some are more challenging to defeat than others.
The PvM part of the game is really extensive and includes many activities, such as:
- Fishing
- Mining
- Dungeons
- Metins & Chaoses
- Quests
Fishing
Fishing is a mini-game that allows players to catch various types of fishes.
In order to start Fishing, you need level 30, a Fishing Rod and some baits (Worms or Paste) from Fisherman. This NPC can be found in different places around Towns.
When a player catch a fish, they can sell it to an NPC for a small amount of money, open it, or cook it on a Campfire. Once cooked, the fishes will provide you some special effects, such as restoring healt,or increasing a player’s stats.
Also, you can get a Clam from a fish too, and if you are lucky enough, you may get a pearl, which come in three different colors: white, blue and red.
Mining
Mining is a gathering activity that allow players to collect ores from Veins that are scattered throughout the game world.
In order to start Mining, you need level 30 and a Pickaxe, that can be obtained from Deokbae. This NPC can be found in every map2.
Once a player have a pickaxe, they can approach a vein (there are over 15) and click on it to start mining. When a player successfully mine a vein, they can collect the ores that have been extracted.
Whenever a player reaches a total of 100 ores of the same type ,they can smelt them into a Refine Piece of Ore, at a specific NPC.This Ore, can be embedded into your equipment and it will provide a boosts.
Dungeons
Dungeons are special instances in WoM2 that contain powerful Monsters, Metins and Bosses. Some dungeons can be completed solo, while others require a group of players to complete, and they can be accessed through portals that are located in various areas of the game world.
When players enter a dungeon, they must fight their way through waves of monsters and other enemies. The difficulty of the dungeons increases as players progress further, and they will eventually face off against a Boss at the end of the dungeon.
To successfully complete a dungeon, players will need to work together and use their skills and abilities strategically. Comunication is key, as players will need to coordinate their attacks and support each other to survive.
Defeating the boss at the end of the dungeon can yield valuable rewards, such as rate items, coffers, equipment and experience points.
Metins & Chaoses
The WoM2 world is full of Metins, which are powerful stones that players can hunt for valuable rewards. Each map in the game, has it’s own type of Metin stones with different levels and associated monster spawns.
The difficulty and the rewards of Metins are different and increases with the level of the stone, and the map where is placed.
However, if you are lucky enough, from the regular Metins you can drop a Fragment of that specific Metin type. If you manage to collect 10 of the same type, you’ll summon a Chaos Metin.
Chaos Metins are much more challenging then regular Metins, but they will provide better rewards. When attacking one, players will receive a “Chaos Curse”, a sort of debuff, which will lower their damage output. The monster from these type of stones are also harder to defeat, because of the increased damage and other modifiers, so be on your guard!
Quests
Quests are tasks or missions that players can complete to earn rewards, such as experience points, items and gold. Quests can be obtained from levels and NPCs throughout the game world, and often involve completing certain tasks or objectives.
In WoM2, quests come in many different forms. Some are simple tasks, such as delivreing an item to an NPC or defeating a certain number of monsters. Others are more complex, involving multiple steps and requiring players to explore different areas of the game world.
Some quests have been reworked and now offers permanent bonuses. Some will unlock new areas of the game world, such as new maps or dungeons.Some others can be repeated multiple times, allowing players to earn rewards each time they complete them.
Golden Frog: For this event we use 5 neutral maps ( Valley, Snakefield, Yongbi Desert, Fireland and Sohan Mountain). The GM will hide in a spot transformed in a golden frog and players have to find it.
Note: The player has to open the trade window to the GM in order to receive his reward.
Metin Rain: GM’s usually run this event on 2 neutral maps. One map for low level players below level 60 - Yongbi Desert. Another for higher level players above level 60 - Sohan Mountain.
Number of metins spawned depends on the number of online players at the moment.
Boss Event: Same as Metin Rain event, this event will take place in two different maps. Number of bosses spawned depends on the number of online players at the moment.
Pirate Tanaka:Take down the pirates and loot their gold stashes. This event will take place in Yongbi Desert.
Fox Hunt: Gather your fastest and most athletic players from your kingdom and compete in the most fun fox chases of all time. The fastest kingdom that will catch all the foxes will receive 25% drop chance for 24 hours .
Mining Event: Sharpen your pickaxe and get ready to stash some ores in your warehouse. Duration: 30 minutes.
OX Event: Can be accessed by Uriel.Players who participate compete with each other to answer questions correctly, where O = true and X = false.
Players who answered wrong are automatically wiped out to the outer field.
Nation War:The Nation War is an Open PvP event where the 3 empires fight against each other.
- The event will automatically close when it is over.
- First place will receive a 50% experience bonus for 48 hours.
- Second place will receive a 25% experience bonus for 48 hours.
- Third place will receive a 10% experience bonus for 48 hours.
Dojang Tournament:Each round the duelists are determined randomly.
The players will automatically be teleported into the arena.
Bookday:You can exchange some of your old books for brand new tomes. Duration: 24 hours.
Mystery Box: Noone can say for certain what those boxes really contain. Duration: Until next event-next day or 24 hours if there is no event next day.
Puzzle Box: Puzzles are hard, but the reward for completing them is huge. Duration: Until next event-next day or 24 hours if there is no event next day.
Hexagonal Box: This type of box will contain lots of treasures. Duration: Until next event-next day or 24 hours if there is no event next day.
Moonlight Treasure Box: People say that under the moonlight those boxes will appear supernatural. Duration: Until next event-next day or 24 hours if there is no event next day.
Hangman's Box: Guess the secret word and receive a big reward. Duration: Until next event-next day or 24 hours if there is no event next day.
Alchemy
Basic Informations
Dragon Stone Alchemy is a system that consists in obtaining, refining and using Dragon Stones, thanks to which the character receives additional bonuses.
When your character reaches level 50, you will be able to unlock the Alchemy UI and the ability to earn Dragon Stone Shards through the Alchemist's quest "The Mysterious Stone".
After completing this quest, a daily drop quota for Dragon Stone Shards is enabled. The daily shard drop is as follows:
- 10x Cor Draconis (Rough)/Day, level 50-74
- 15x Cor Draconis (Rough)/Day, level 75-89
- 20x Cor Draconis (Rough)/Day, level 90-99
Dragon Stone Shard

You can get this item from monsters. After getting ten pieces, it will turn into x1 Cor Draconis (Rough).
Cor Draconis (Rough)

If you open it you will get a random Alchemy Stone (Rough)
Diamond, Ruby, Jade, Sapphire, Garnet, Onyx


Each stone is divided into classes and clarity. The higher the class/clarity, the better the bonuses. Below you can see a list of them, from lowest to highest.
| No. |
Class |
Clarity |
| 1 |
Rough |
Minor |
| 2 |
Cut |
Low Class |
| 3 |
Rare |
Intermediate |
| 4 |
Antique |
High |
| 5 |
Legend |
Super Class |
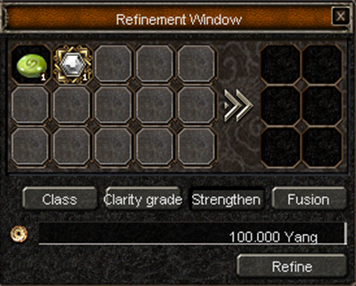
Class Upgrade
To upgrade the class you need more Dragon stones of the same class.
Put the needed dragon stone in the appropriate slots and click “refine”.
When the process fails you will keep one stone with the same class.
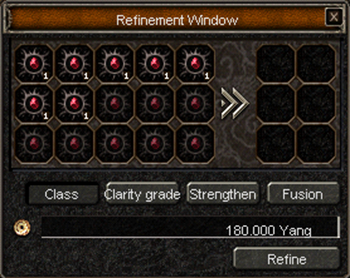
Clarity Upgrade
To upgrade the clarity you need more Dragon stones of the same clarity.
Put the needed dragon stone in the appropriate slots and click “refine”.
When the process fails you will keep one stone of the same clarity grade
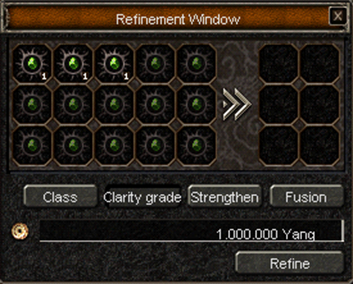
Level Upgrade
Put the bean and one dragon stone in the appropriate slots and select “refine".
The refinement can fail, in this case The dragon stone level is reduced by or remains unchanged.
Alchemy Items
Green Dragon Bean

The magic bean increases your Dragon Stone's level.
Time Elixir
Each Dragon Stone has a duration. This timer only expires while the set it is in is active. If we want to extend the duration of our Dragon Stone, we can use the Time Elixir on it.
Tongs of Time

You can craft a Time Elixir with this item. Just drag it onto any dragon stone you have. The % of the Time Elixir depends on the class of the dragon stone.
Dragon Tongs

Increases the chance of successfully removing a Stone.
Types of Alchemy
There are multiple types of alchemy, each one providing you with different base and secondary bonuses.
Base bonuses are fixed, while the two secondary bonuses are random from that list.
Diamond


Base Bonuses:
Secondary Bonuses:
- Magic Attack Power
- Magical Defense
- Skill Damage
- Resistance against Skill Damage
- Strong against Metin Stones
- Critical Power Boost
Ruby


Base Bonuses:
Secondary Bonuses:
- Attack Value
- Defense
- Average Damage
- Average Damage Resistance
- Strong against Warrior
- Pierce Power Boost
Jade


Base Bonuses:
Secondary Bonuses:
- Max. HP
- HP Regeneration
- x% Damage will be absorbed by HP
- Chance of Critical Hit
- Max. HP %
- Strong against Mages
Sapphire


Base Bonuses:
Secondary Bonuses:
- Resistance to Warrior Attack
- Resistance to Assassin Attack
- Resistance to Sura Attack
- Resistance to Mage Attack
- Strong against Bosses
- Poison Resistance
Garnet


Base Bonuses:
Secondary Bonuses:
- Max. SP %
- SP Regeneration %
- Max. SP
- Magic Resistance
- Strong against Assassin
- Strong against Monster
Onyx


Base Bonuses:
Secondary Bonuses:
- Chance to block physical attacks
- Chance to dodge arrows
- Chance to reflect direct body hit
- Critical hit chance reduction
- Pierce hit chance reduction
- Strong against Sura
